Documentation
Welcome to the PMX-1 documentation. This is where you can explore all the
features and possibilities of mixing with PMX-1. To get started, have a look
in the Getting Started section, which will guide you through the different
ways available to install and run PMX-1.
PMX-1 is a performance mixer build on top of pipewire
and wireplumber. For an overview if what PMX-1 can do, see no further than the
Overview section. If what you find there sounds interesting,
head to the Getting Started section to get PMX-1 up and
running.
1 - Overview
What is PMX-1 and what does it do?
At its core, PMX-1 is a digital stereo performance mixer with three stages. The
first stage, the input stage, provides 16 stereo inputs. The stereo inputs are
duplicated, each input is routed into two stereo channels with its own
saturator, equalizer and compressor. These 32 channels are then feed into the
second stage, the group stage. The Input Channels
section describes the input stage in more detail.
The group stage consists of two group mixers, each of them grouping 16 channels
from the input stage, so that each group mixer receives every signal present at
the inputs. Those are routed into 4 group channels, each with a compressor and
an equalizer. In practice, this means that means that PMX-1 creates two
completely mixes, called layers, which are feed into the third stage, the layer
stage. The Group Channels section describes the group
channels in more detail.
The layer stage provides 2 stereo channels, each the input for 4 group channels,
of for each group mixer in the group stage. The layer stage combines those to
one stereo channel, the output of PMX-1. The
Layer Channels section describes the layer channels in
more detail.
flowchart LR
  I[Input Channels]
  A[Group A]
  B[Group B]
  L[Layer Mixer]

  I -- 16 stereo channels --> A
  I -- 16 stereo channels --> B
  A -- 4 stereo channels --> L
  B -- 4 stereo channels --> L
What’s next?
Excited? Want to get started? Then go to the
Getting Started section and rock on!. If you want to
look under the hood and maybe get your fingers dirty with some hacking, go to
the Architecture section or have a look at
Hacking.
2 - Getting Started
Installing PMX-1 and the first audio output?
The following section explain how to install and set up PMX-1 as well as how to
connect the first audio device. Afterwards you should be ready so use PMX-1 and
move on to the Tutorials or the rest of the Documentation.
This section describes the installation and a short usage example. It shows how
to do the following:
- Install the dependencies
- Install PMX-1 from source either with the AUR package or by cloning
the repository
- Set up the Open Stage Control GUI
- Connect hydrogen to the mixer
Prerequisites
PMX-1 is a Linux application written in C++. It use systemd, pipewire and
wireplumber, and depends on GRPC, Protobuf, and other libraries. For
development and debugging tools, it also depends on fish.
It uses meson and g++ for compilation.
The mixer uses several LV2 plugins for signal processing.
Installing dependencies on Arch Linux
To install (nearly) all dependencies in one shot, use the following command:
sudo pacman -S systemd pipewire wireplumber boost grpc protobuf yaml-cpp \
    libsystemd dbus fish git meson pipewire-audio pipewire-jack calf jalv \
    dpf-plugins-lv2 tmux cmake
Afterwards, we need to install two dependencies from the AUR.
Installing replxx
PMX-1 also uses replxx, which only has an AUR package so far. To install that,
either uses the AUR helper of your choice, or clone the repository and build
the package as follows:
git clone https://aur.archlinux.org/replxx.git
cd replxx
makepkg
sudo pacman -U replxx-*.pkg.tar.zst
Installing open-stage-control
git clone https://aur.archlinux.org/open-stage-control-bin.git
cd open-stage-control-bin
makepkg
sudo pacman -U open-stage-control-bin-*.pkg.tar.zst
Installation
PMX-1 is implemented in multiple repositories, which ultimately culminate in
three installations: the PMX-1 back-end services, the Admin UI to configure
routing, and the Open Stage Control GUI.
Installing the back-end services
TODO: Move the package to the AUR
The back-end services are implemented as a collection of interconnected
custom pipewire filters, filter chains, osc and grpc services and wireplumber
scripts, all orchestrated and managed as systemd units and configured via
pipewire metadata.
To install all of that using the AUR package, execute the following commands:
git clone https://github.com/performance-mixer/pmx-git-arch
cd pmx-git-arch
makepkg
sudo pacman -U pmx-*.pkg.tar.zst
Installing the Admin UI
The PMX-1 Admin UI is an ASP.net application. It uses the GRPC API to
communicate with the mixer and can be run everywhere, in this section, we will
show how to build and install the application, the setup will be described in
the Setup section.
Running straight from the repository
The easiest way to run the Admin UI is to clone the repository and run it
straight from the project directory.
git clone https://github.com/performance-mixer/pmx-grpc
git clone https://github.com/performance-mixer/pmx-admin-ui
cd pmx-admin-ui/Pmx.Admin.Ui/
dotnet run
This will start the application and print the URL it listens on. Open it in
the browser and the Admin UI is ready.
Installing system-wide
TODO:
- Systemd unit files for admin ui management
- Build and install script
- PKGBUILD and AUR package
Installing the GUI
The Open Stage Control GUI is distributes as and Open Stage Control Interface,
which can be opened and edited in Open Stage Control exactly like any other
interface. To get the latest delivered version, clone the git repository.
git clone https://github.com/performance-mixer/pmx-osc-ui
To start the GUI, open pmx_osc_ui.json in Open Stage Control.
Setup
Is there any initial setup users need to do after installation to try your project?
Try it out
Can your users test their installation, for example by running a command or deploying a Hello World example?
2.1 - Install
Installing PMX-1
This section shows how to install PMX-1 on different Linux distributions
(well, in the future, for now its only Arch).
This section describes the installation on different Linux distributions.
It shows how to do the following:
- Install the dependencies
- Install PMX-1 Back-end services
- Install The Admin UI
- Install the Open Stage Control GUI
2.1.1 - Arch Linux
Install on arch linux.
This section describes the installation on Arch Linux.
Prerequisites
PMX-1 is a Linux application written in C++. It use systemd, pipewire and
wireplumber, and depends on GRPC, Protobuf, and other libraries. For
development and debugging tools, it also depends on fish.
It uses meson and g++ for compilation.
The mixer uses several LV2 plugins for signal processing.
Installing dependencies on Arch Linux
To install (nearly) all dependencies in one shot, use the following command:
sudo pacman -S systemd pipewire wireplumber boost grpc protobuf yaml-cpp \
    libsystemd dbus fish git meson pipewire-audio pipewire-jack calf jalv \
    dpf-plugins-lv2 tmux cmake
Afterwards, we need to install two dependencies from the AUR.
Installing replxx
PMX-1 also uses replxx, which only has an AUR package so far. To install that,
either uses the AUR helper of your choice, or clone the repository and build
the package as follows:
git clone https://aur.archlinux.org/replxx.git
cd replxx
makepkg
sudo pacman -U replxx-*.pkg.tar.zst
Installing open-stage-control
git clone https://aur.archlinux.org/open-stage-control-bin.git
cd open-stage-control-bin
makepkg
sudo pacman -U open-stage-control-bin-*.pkg.tar.zst
Installation
PMX-1 is implemented in multiple repositories, which ultimately culminate in
three installations: the PMX-1 back-end services, the Admin UI to configure
routing, and the Open Stage Control GUI.
Installing the back-end services
TODO: Move the package to the AUR
The back-end services are implemented as a collection of interconnected
custom pipewire filters, filter chains, osc and grpc services and wireplumber
scripts, all orchestrated and managed as systemd units and configured via
pipewire metadata.
To install all of that using the AUR package, execute the following commands:
git clone https://github.com/performance-mixer/pmx-git-arch
cd pmx-git-arch
makepkg
sudo pacman -U pmx-*.pkg.tar.zst
Installing the Admin UI
The PMX-1 Admin UI is an ASP.net application. It uses the GRPC API to
communicate with the mixer and can be run everywhere, in this section, we will
show how to build and install the application, the setup will be described in
the Setup section.
Running straight from the repository
The easiest way to run the Admin UI is to clone the repository and run it
straight from the project directory.
git clone https://github.com/performance-mixer/pmx-grpc
git clone https://github.com/performance-mixer/pmx-admin-ui
cd pmx-admin-ui/Pmx.Admin.Ui/
dotnet run
This will start the application and print the URL it listens on. Open it in
the browser and the Admin UI is ready.
Installing system-wide
TODO:
- Systemd unit files for admin ui management
- Build and install script
- PKGBUILD and AUR package
Installing the GUI
The Open Stage Control GUI is distributes as and Open Stage Control Interface,
which can be opened and edited in Open Stage Control exactly like any other
interface. To get the latest delivered version, clone the git repository.
git clone https://github.com/performance-mixer/pmx-osc-ui
To start the GUI, open pmx_osc_ui.json in Open Stage Control.
2.2 - Setup
How to set up PMX-1.
PMX-1 has several components that can be configured. Generally if there are no
conflicts with ports on your system, the defaults should all work out of the
box. Nevertheless, the following section will provide an overview of what can
be configured and how.
The Audio Output
The outputs of the layer mixer are configured to be automatically connected to
the default output set in the pipewire metadata. Use your favorite system tool
to select the output you want to use.
OSC API
The OSC API is the main means of communication with PMX-1. It is used to
control the various parameters of the filter chains that comprise the heart of
the mixer.
Network Receiver
The port which network receiver listens on is currently hard-coded to 33334.
Network Sender
The address and port to which network sender sends to is currently hard-coded
to 127.0.0.1:3300.
Open Stage Control
To configure Open Stage Control to send and receive osc messages set up the
following:
- Set send to
127.0.0.1:33334 - Set osc-port to
3300
Control Surfaces
A mixer wants to be controlled by fader, knobs and buttons, PMX-1 is no
exception and comes with robust controller support.
Faderfox PC-4
The Faderfox controller has to be connected to the Midi Router. Additionally,
because it can be highly customized, if the default configuration has been
changed, the config has to be changed to factory settings.
Behringer CMD MM-1
This one is plug and play, it only needs to be connected to the Midi Router, the
wireplumber scripts should take care of everything.
Traktor Z1
The Traktor Z1 is actually not a midi controller, but registers as a HID device
which Linux exposes as a file named /dev/hidrawX. The device to use is
configured in ~/.config/traktor-z1.config. The configuration file recognizes
exactly one entry DEVICE_NAME=<device_name> where <device_name> is the
absolute path to the device file.
GRPC API
The port which the GRPC API listens on is currently hard-coded to 50051.
2.3 - Connect
Connect hydrogen and make some noise.
This section decribes how to connect hydrogen to one of the inputs of PMX-1.
Prerequisites
The only prerequisite after all the work we did for setup and installation is
to install hydrogen.
Installing Hydrogen on Arch Linux
Setup
Hydrogen, at least on my Arch Linux, is set up to connect to the default JACK
audio output. To disable that, open the settings menu Options -> Preferences
and select the Audio System tab. Uncheck the Connect to default JACK output ports options. Restart hydrogen afterwards.
Hydrogen should now start without automatically connecting the audio outputs.
Fire up PMX-1
The various services for the PMX-1 back-end are implemented with systemd in
mind and should be started as a user service. To manage the services and
monitor the logs the systemd tools systemctl and journalctl can be used.
An easier way to control the mixers services is to use the provided PMX-1
console application pmx-console which provides easy access to the main
mixer management tasks. The easiest way to to set up the console, start the
parameter monitor and systemd log streaming in one go is to use the provided
debug script pmx-debug-tmux.fish, which uses tmux to create a viewer like
show in the following screenshot.
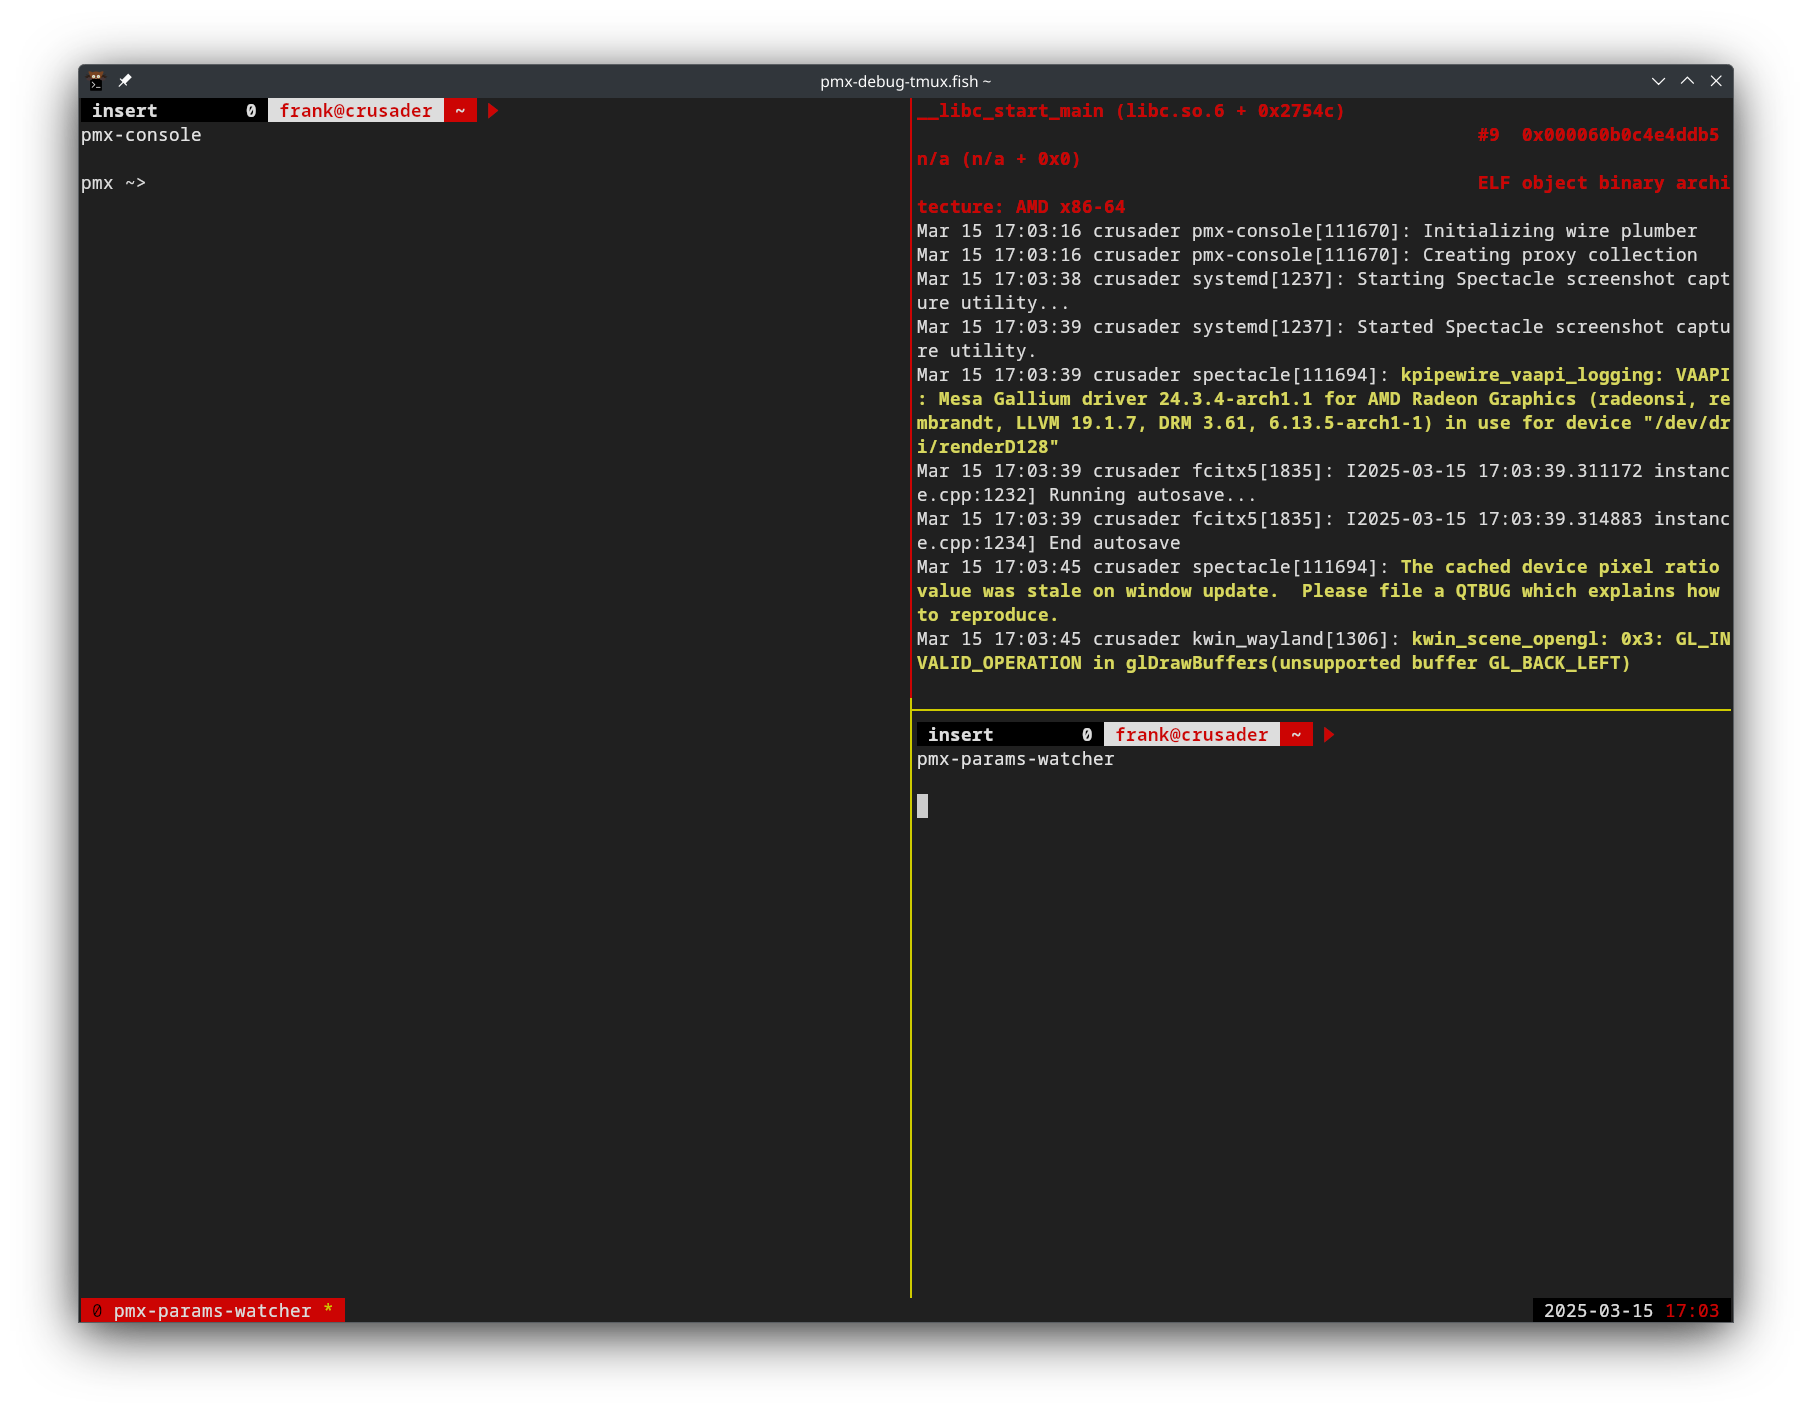
The script starts tmux with pmx-console in the first window, journalctl
following the user logs in the top right window and pmx-params-monitor in the
bottom left corner, displaying the parameter changes in real time.
First we will check if the services are already running. Select the top left
window, the one running pmx-console and run the status command. The output
should be something similar to the following:
pmx-console

pmx ~> status
pipewire.service active
wireplumber.service active
pmx-filter-chain-ctrl.service  enabled
pmx-grpc-api.service  enabled
pmx-metadata-manager.service  enabled
pmx-midi-router.service  enabled
pmx-osc-network-receiver.service  enabled
pmx-osc-network-sender.service  enabled
pmx-traktor-z1-router.service  enabled
pmx-filter-chains.service  enabled
couldn't find producer pmx-midi-router
couldn't find producer pmx-osc-network-receiver
couldn't find producer pmx-traktor-z1-router
couldn't find consumer pmx-filter-chain-ctrl
couldn't find consumer pmx-osc-network-sender
pmx ~>
In this case, pipewire and wireplumber are running, but the PMX-1 services are
only enabled and not running, because no other service actively requested them.
To start the services run the start command. This will spark a flurry of
activity in the log and the params watcher window, but ignoring those for now,
the output of the start command should be a new line, which indicated that no
error occurred and systemd accepted the command. Beccause systemd starts the
services asynchronously, this doesn’t mean the services were started
successfully, so we should run the status command again and if the output is
something like the following, we’re good to go.
pipewire.service active
wireplumber.service active
pmx-filter-chain-ctrl.service active
pmx-grpc-api.service active
pmx-metadata-manager.service active
pmx-midi-router.service active
pmx-osc-network-receiver.service active
pmx-osc-network-sender.service active
pmx-traktor-z1-router.service active
pmx-filter-chains.service active
Otherwise, unfortunately, the services weren’t started successfully and
troubleshooting is the name of the game. If you’re stuck, head to the
Community section and ask for help.
Connect Using the Admin UI
Start the admin UI based on the chosen installation method from
Install. Open the browser and navigate to the admin UI, normally
available at http://localhost:5078. Navigate to the Inputs tab. Here the
Admin UI presents the configuration of the 16 stereo input ports of the mixer.
We will connect Hydrogen to channel 1 of PMX-1. First, set the channel up to be
a stereo channel. Make sure the stereo checkbox for channel 1 is checked.
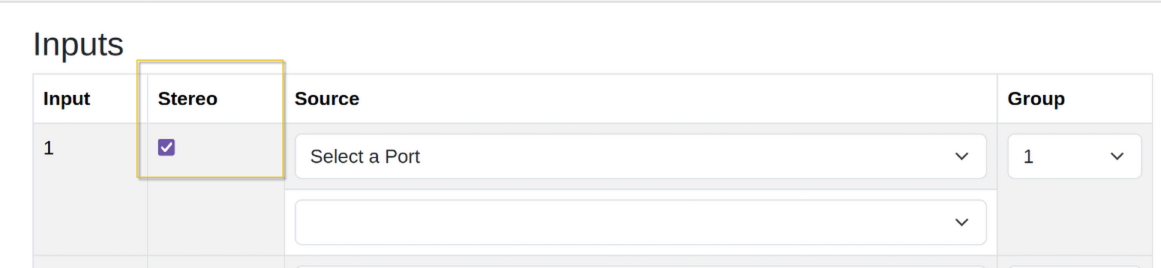
Select the ports names and for the left and right source channels of
channel 1 as shown in the following screenshot.
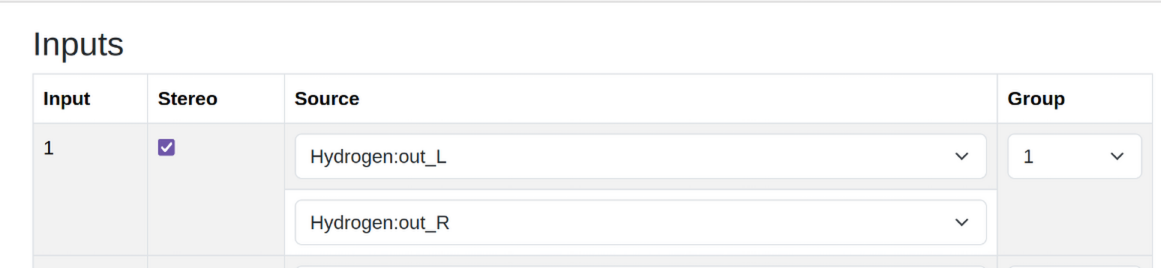
If you start the playback in hydrogen now, it should be audible.
3 - Architecture
How is it build?
At its core, PMX-1 tries to use as much functionality as possible from the
underlying Linux desktop infrastructure, especially systemd, pipewire, and
wireplumber.
Systemd is used to manage the services and their startup, provides the logging
system, and an easy means to set up simple configuration files. Albeit that is
important functionality, it is not the focus of this section.
Pipewire provides the heart of the functionality, it is used to route the
audio and control data, provides the filter chains for the signal processing in
the mixer channels and other functionality, for example metadata for
configuration. The functionality of pipewire is extended by wireplumber, which
provides us the means to watch and react to changes in the pipewire graph. This
is used to manage connections, either based on changes in the graph, like the
addition of a new port, or changes to metadata.
The following section describes how pipewire and wireplumber are used in PMX-1.
Audio Flow
Audio flow is pipewires domain, and except for the
connection management, completely implemented using
pipewire. The filter chain module is used to build four filter chains:
Each filter chain is built out of several interconnected LV2 plugins and are
described in more detail in the respective sections.
The audio inputs are connected to one stereo channel of the input channels.
Each input channel is then connected to one group channel in layer A and one
group channel in layer B. The group channels are then connected to the layer
mixer. The setup is illustrated in the following diagram:
Every line in the following diagram represents multiple connections between
nodes. Dotted lines are managed connections, connections that are created based
on configuration or events, for example a new port being added to the graph.
flowchart LR
  A -.-> B
Solid lines are static connections, they are created when both nodes are
available for the first time and not touched again.
flowchart LR
  A --> B
---
title: Audio Connections
---
flowchart LR
  HI[Inputs]
  D[Default Output]
  IFC[Inputs Filter Chain]
  GFCA[Groups Filter Chain A]
  GFCB[Groups Filter Chain B]
  LFC[Layer Filter Chain]

  HI -.-> IFC
  IFC -.-> GFCA
  IFC -.-> GFCB
  GFCA --> LFC
  GFCB --> LFC
  LFC -.-> D
Pipewire is used to create the filter chains and it transports the audio data in
between the participants. The connection are handled by wireplumber, this is described
in the section Connection Management.
Control Flow
The other big part of the system is the ability to control the mixer. This is
implemented using OSC and MIDI, with the help of custom pipewire filters. The
control flow for mixer parameters is described in the next
section.
The other part is Setup and Configuration of the
mixer which is implemented using GRPC and a custom front end Admin UI.
Mixer Parameters
The mixer parameters are all parameters of the LV2 and built-in plugins used
in the filter chains. They determine the sound of the mixer and are controlled
either using the OSC API or MIDI. The control flow is illustrated in the
following diagram.
Dotted lines in the forthcoming diagram represent control data that is sent
using a means outside of pipewire. For MIDI data, that typically means USB MIDI
or MIDI provided by an audoio interface, for OSC data, that means OSC over UDP.
flowchart LR
  A -. OSC .-> B
Solid lines are pipewire links, transmitting the control data embedded in
SPA Pods.
flowchart LR
  A -- Midi --> B
As one can see immediately, most actual pipewire links transmit OSC data, and
that is no accident, as OSC was chosen for the internal communication, due to
its much greater power in comparison to MIDI. The MIDI interface is basically
provided by the MIDI Router which takes the MIDI data from the hardware via the
ALSA MIDI bridge and converts it to OSC data.
---
title: Front End Interfaces and Clients
---
flowchart LR
  M[Mixer UI]
  H[Midi Hardware]
  MB[Midi Bridge]
  R[OSC Network Receiver]
  S[OSC Network Sender]
  MR[Midi Router]
  FCC[Filter Chain Control]

  M -. OSC .-> R
  S -. OSC .-> M
  H -. Midi .-> MB
  MB -- Midi --> MR
  MR -- OSC --> FCC
  R -- OSC --> FCC
  MR -- OSC --> S
  R -- OSC --> S
The interface to inject OSC messages into the system is provided by the OSC
Network Receiver, which listens on an UDP port and sends every message it
receives along its output.
MIDI Router and Network Receiver both send OSC messages to the Filter Chain
Control. Filter Chain Control interprets the messages and translates them into
filter chain parameter changes which it applies to the filter chains as shown
below.
---
title: Filter Chain Control
---
flowchart LR
  IFC[Inputs Filter Chain]
  GFCA[Groups Filter Chain A]
  GFCB[Groups Filter Chain B]
  LFC[Layer Filter Chain]
  FCC[Filter Chain Control]

  FCC .-> IFC
  FCC .-> GFCA
  FCC .-> GFCB
  FCC .-> LFC
Additionally, MIDI Router and Network Receiver send the same data to the OSC
Network Sender, so that every change in the system that is generated by the
MIDI or the OSC interface is feed-back along the OSC Network Sender to the
Mixer UI, which can then update its controls.
Setup and configuration
---
title: Setup
---
flowchart LR
  Meta[Metadata]
  A[Admin UI]
  G[GRPC API]

  A -. GRPC .-> G
  G -.-> Meta
Connection Management
Connection management is implemented mostly in wireplumber lua scripts, which
listen to metadata changes and changes in the graph.
Audio Connections
The connection from the layer mixer to the output is controlled by wireplumber
with the normal means of configuration. The connections from the group channels
to the layer channels are created when the filter chains are first built.
The connections have the same meaning as in the Audio Flow section.
---
title: Audio Connections
---
flowchart LR
  HI[Inputs]
  D[Default Output]
  IFC[Inputs Filter Chain]
  GFCA[Groups Filter Chain A]
  GFCB[Groups Filter Chain B]
  LFC[Layer Filter Chain]

  HI -.-> IFC
  IFC -.-> GFCA
  IFC -.-> GFCB
  GFCA --> LFC
  GFCB --> LFC
  LFC -.-> D
The links between the inputs and the input channels, as well as the links
between the input channels and the group channels, are managed by wireplumber
scripts, and a custom metadata object named performance-mixer. The
wireplumber scripts listen for changes in the metadata and destroy and create
links based on that.
Control Connections
Control connection management is dead simple, a wireplumber script connects all
output ports named pmx-osc to all input ports named pmx-osc. Adding a new
parameter processor is as simple as adding a new port to the graph.
---
title: Control Connections
---
flowchart LR
  MR[Midi Router]
  ONR[OSC Network Receiver]
  ONS[OSC Network Sender]
  TZ1[Traktor Z1 Router]

  ONR --> FCC
  MR --> FCC
  TZ1 --> FCC
  ONR --> ONS
  MR --> ONS
  TZ1 --> ONS
The metadata object itself is created using the per-delivered wireplumber script
metadata.lua in the pmx.conf wireplumber configuration file. This makes
sure that the metadata object is created on start up and will be available to
all services that depend on it.
To use the metadata object, all the services connect to the existing metadata
object and either listen to changes or update the metadata object themselves.
The relationship between the metadata object and the services is described in
the following diagram.
---
title: PMX Back-end Services - Metadata Handling
---
flowchart LR
  WP[WirePlumber]
  M[Metadata]
  MM[Metadata Manager]
  GRPC[GRPC API]
  PWM[pw-metatada]

  WP -- creates metadata --> M
  GRPC -- updates metadata --> M
  PWM -- updates metadata --> M
  M -- reacts to changes --> MM
  MM -- creates inital data --> M
  M -- reacts to changes --> WP
4 - Input Channels
Describes the Input Channels
The input channels section provides 16 stereo inputs. Each of the stereo inputs
are copied, and the fed into a channel strip each. This means that for each
stereo input, the input channels section has two independent channel strips.
One of the channel strips is said to belong to layer A, the other one to layer
B. Each layer will then be routed through their own
group mixer. The two group mixer are then brought
together in the layer mixer. That provides you, the
artist with two completely independent mixes that can be combined as desired.
The following diagram illustrates the signal flow for one input channel.
---
title: One Input Channel
---
flowchart LR
  L[Left]
  R[Right]
  LC[Copy]
  RC[Copy]
  SATA[Saturator A]
  CMPA[Compressor A]
  EQUA[Equalizer A]
  SATB[Saturator B]
  CMPB[Compressor B]
  EQUB[Equalizer B]

  L --> LC --> SATA
  R --> RC --> SATA
  LC --> SATB
  RC --> SATB
  SATA ==> CMPA ==> EQUA
  SATB ==> CMPB ==> EQUB
Plugins
5 - Group Channels
Describes the Group Channels
---
title: The Group Mixer
---
flowchart LR
  CMPA[Compressor A]
  EQUA[Equalizer A]
  CMPB[Compressor B]
  EQUB[Equalizer B]
  CMPC[Compressor C]
  EQUC[Equalizer C]
  CMPD[Compressor D]
  EQUD[Equalizer D]
  MIXL[Mixer L]
  MIXR[Mixer R]

  CMPA ==> EQUA --> MIXL
  CMPB ==> EQUB --> MIXL
  CMPC ==> EQUC --> MIXL
  CMPD ==> EQUD --> MIXL
  EQUA --> MIXR
  EQUB --> MIXR
  EQUC --> MIXR
  EQUD --> MIXR
Plugins
6 - Layer Channels
Describes the Layer Channels
---
title: The Layer Mixer
---
flowchart LR
  CMPA[Compressor A]
  EQUA[Equalizer A]
  CMPB[Compressor B]
  EQUB[Equalizer B]
  MIXL[Mixer L]
  MIXR[Mixer R]

  CMPA ==> EQUA --> MIXL
  CMPB ==> EQUB --> MIXL
  EQUA --> MIXR
  EQUB --> MIXR
Plugins
7 - Open Stage Control GUI
Describes the Open Stage Control GUI
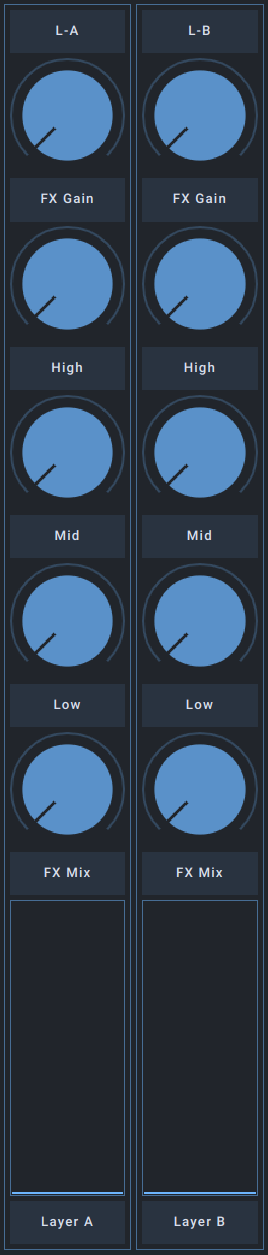
The Open Stage Control GUI is a web-based interface, implemented with
Open Stage Control, that allows control
of PMX-1 from a web browser. The UI sends OSC messages to PMX-1 and also listens
to the feed-back OSC messages from PMX-1. That means that the GUI can be used
to control the mixer, as well as monitor parameter changes.
Setup
Open Stage Control sends and receives OSC messages over UDP.

As can be seen in the screenshot above, the GUI is divided into six sections:
- The input section for layer A all the way on the left hand side
- The input section for layer B all the way on the right hand side
- The group section for layer A on the right of the input section for layer A
- The group section for layer B on the left of the input section for layer B
- The layer section in the middle of the GUI
- The layer selector at the bottom of the GUI, under the layer section

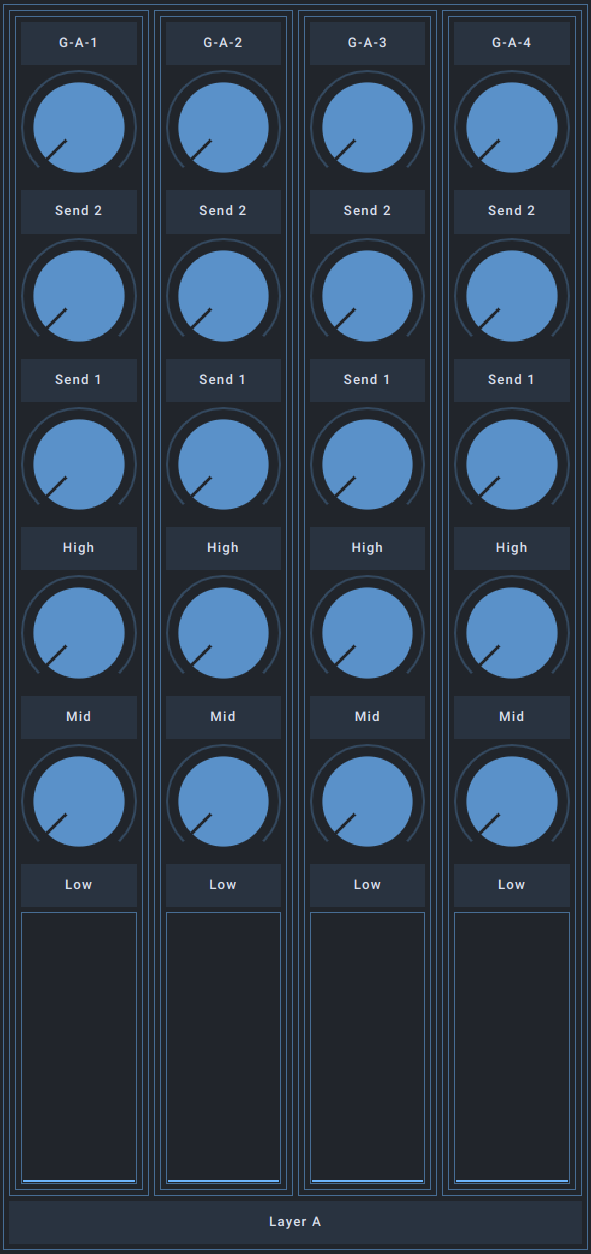
Group Section
Layer Section
Layer Selector

TODO: Implement the layer selector
8 - Settings
Setup signal routing
9 - Control Surfaces
Control the Mixer with Midi Controllers and other Control Surfaces
PMX-1 currently supports two midi controllers, the Faderfox PC4, and the
Behringer CMD-1, as well as one USB HID device, that can also be used as audio
interface, the Native Instruments Traktor Z1.
The two midi controllers are usable with the default configuration, plug and
play, the following sections describe how to use them. The Native Instruments
controller needs some configuration before it can be used, the necessary steps
are described in the Traktor Z1 section.
9.1 - Akai MidiMix
Control the Input Channels with the Akai Midimix
9.2 - Faderfox PC4
Control the Input Channels with the Faderfox PC4
The Faderfox PC4 is set up to be automatically connected to the correct output
when PMX-1 is running. PMX-1 recognizes the default configuration of the
Faderfox PC4. The control numbers are mapped as shown in the table below, and
each Midi channel is mapped to the corresponding layer, depending on the layer
selector, either on the
Behringer CMD-1, or on
the Open Stage Control GUI.
| Faderfox PC4 - CC Number and Parameter Mapping |
|---|
|
| 1 | CC #1 | CC #2 | CC #3 | CC #4 |
Saturator
level in | Saturator
drive | Saturator
blend | Saturator
level out |
| 2 | CC #5 | CC #6 | CC #7 | CC #8 |
Compressor
threshold | Compressor
ratio | Compressor
attack | Compressor
release |
| 3 | CC #9 | CC #10 | CC #11 | CC #12 |
Compressor
makeup | Compressor
knee | Compressor
mix | |
| 4 | CC #13 | CC #14 | CC #15 | CC #16 |
Equalizer
low | Equalizer
mid | Equalizer
high | Equalizer
master |
| 5 | CC #17 | CC #18 | CC #19 | CC #20 |
Equalizer
low/mid | Equalizer
mid/high | | |
| 6 | CC #21 | CC #22 | CC #23 | CC #24 |
| | | |
9.3 - Behringer CMD-1
Control the Group Channels with the Beheringer CMD-1
CC 1
| CC 2
| E0
| CC 3
| F0
| CC 4
| CC 5
|
CC 6
| CC 7
| CC 8
| CC 9
|
CC 10
Equalizer
High | CC 11
Equalizer
High | CC 12
Equalizer
High | CC 13
Equalizer
High |
CC 14
Equalizer
Mid | CC 15
Equalizer
Mid | CC 16
Equalizer
Mid | CC 17
Equalizer
Mid |
CC 18
Equalizer
Low | CC 19
Equalizer
Low | CC 20
Equalizer
Low | CC 21
Equalizer
Low |
| F#0 |
G0
| G#0
| B0
| C1
| D#1
| E1
| G1
| G#1
|
C3
| C#3
| D3
| D#3
|
CC 48
Equalizer
Master | CC 49
Equalizer
Master | CC 50
Equalizer
Master | CC 51
Equalizer
Master |
CC 64
Layer Selector |
Layer Selector
The cross-fader on the CMD-1 functions as a layer selector. If it is on the
left half of the cross-fade range, every controller is controlling layer A,
otherwise they control layer B. The layer selector is also shown on the
Open Stage Control GUI.
9.4 - NI Traktor Z1
Control the Layer Mixer with the Z1
10 - Tutorials
Explore PMX-1 with examples.
11 - Hacking
How to enhance and improve PMX-1
12 - Reference
All you need to know to use PMX-1 programmatically.
12.1 - OSC API
The open source control API
12.2 - GRPC API
The GRPC API
12.3 - Midi Mapping
Midi Mapping
13 - Contribute
How to contribute!
- Issues are tracked in the GitHub repository for
pmx.